Professional Editionでの追加機能
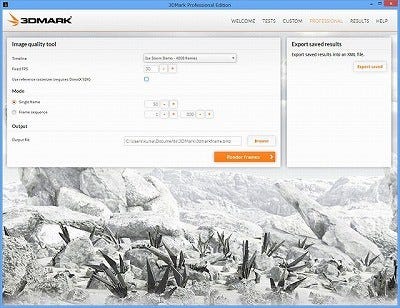
さて、以上が主要な3DMarkの全機能であるが、Professional Editionでの追加機能を幾つか紹介しておく。まずImage Quality Tool(Photo39)であるが、これはテストの任意のフレームの画像を保存してくれるというもの。普通はあまり使わないが、グラフィックドライバの開発とかチューニング、あるいはビデオカードでの画質比較などを行う場合には、これを使って任意のフレームの画像を比較できるために便利な機能である。

|
Photo39: 機能そのものは、3DMark 11などに用意されたものと同じである。DirectX SDKをインストールすると、SDKのReference Rasterizerを使って「本来あるべき画像」をソフトウェアで生成できるので、それとGPUで生成した画像を比較するといったことも容易に行える。まぁ一般ユーザー向けの機能とはちょっと言いがたい。 |
コマンドラインオプションは文字通り、コマンドラインから3DMarkにオプションを与えて実行できる機能である。このために3DMarkCmd.exeというプログラムも用意されており、ここにコマンドラインでオプションを追加して起動すると、自動的に3DMarkが走ってくれる。オプションとしては、
--runall : デモ以外の全てのテストを実施する
--definition=<benchmark.xml> : 指定した定義ファイルにあわせてベンチマークを行う
--loop[=<count>] : 指定した回数ベンチマークを行う。数字を指定しないと無限に行う(これは専ら負荷テストに便利)
--audio[=on|=off] : 音を鳴らすか否か
--systeminfo[=on|=off] : SystemInfoを取得するか否か
--systeminfomonitor[=on|=off] : SystemInfoのモニタリングを行うか否か
--out=<file.3dmark-result> : ベンチ結果を指定したファイルに書き出す
--in=<file.3dmark-result> : 既に保存したベンチマーク結果を読み込む
--online[=on|=off] : ベンチ結果をFuturemarkにオンラインで送付するか否か
--export=<file.xml> : テスト結果のサマリーをXMLで出力するか否か
--feature_level=<level> : 利用するDirectXのレベルを明示的に指定
--scalingmode=<mode> : 画面のスケーリングをするか否か
--log : ベンチの実施ログを取るか否か
--register : ライセンスキーの登録を行う
--unregister : ライセンスキーを解除する
といったものが用意されている。これを使って、例えば、
3DMarkCmd --runall --loop=10 --out=resultAll.3dmark-resultといった記述をしたバッチファイルを生成しておけば、これを実行するだけで全ての3DMarkのテストを10回行い、それぞれの結果をresultAll***.3dmark-resultというファイルに書き出してくれるというものだ。これをやっている間は画面操作は一切不要なので、その間に他の作業を進められるので筆者などには非常にありがたい。
もう一つがXMLでの結果出力だ。こうしたバッチで実行を行うと、終了後にまとめて結果「だけ」をXMLで出力してくれる。このXML出力は、
<benchmark>
  <results>
    <result>
      <icestormoverallscore>132028</icestormoverallscore>
      <icestormgraphicsscore>276931</icestormgraphicsscore>
      <icestormphysicsscore>46631</icestormphysicsscore>
      <cloudgateoverallscore>23044</cloudgateoverallscore>
      <cloudgategraphicsscore>44731</cloudgategraphicsscore>
      <cloudgatephysicsscore>8545</cloudgatephysicsscore>
      <firestrikeoverallscorep>6630</firestrikeoverallscorep>
      <firestrikegraphicsscorep>7148</firestrikegraphicsscorep>
      <firestrikephysicsscorep>12955</firestrikephysicsscorep>
      <firestrikecombinedscorep>2915</firestrikecombinedscorep>
      <firestrikeoverallscorex>3236</firestrikeoverallscorex>
      <firestrikegraphicsscorex>3264</firestrikegraphicsscorex>
      <firestrikephysicsscorex>12973</firestrikephysicsscorex>
      <firestrikecombinedscorex>1478</firestrikecombinedscorex>
      <cloudgategt1_fps>186.53331</cloudgategt1_fps>
      <cloudgategt2_fps>203.14594</cloudgategt2_fps>
      <cloudgatephysics_fps>27.12790</cloudgatephysics_fps>
      <firestrikecombinedp_fps>13.56198</firestrikecombinedp_fps>
      <firestrikecombinedx_fps>6.87905</firestrikecombinedx_fps>
      <firestrikegt1p_fps>33.56424</firestrikegt1p_fps>
      <firestrikegt1x_fps>16.28979</firestrikegt1x_fps>
      <firestrikegt2p_fps>28.93702</firestrikegt2p_fps>
      <firestrikegt2x_fps>12.57478</firestrikegt2x_fps>
      <firestrikephysicsp_fps>41.13010</firestrikephysicsp_fps>
      <firestrikephysicsx_fps>41.18561</firestrikephysicsx_fps>
      <icestormgt1_fps>1206.30554</icestormgt1_fps>
      <icestormgt2_fps>1201.80042</icestormgt2_fps>
      <icestormphysics_fps>148.03508</icestormphysics_fps>
      <system_cpu>Intel(R) Core(TM) i7-3960X CPU @ 3.30GHz</system_cpu>
      <system_gpu>AMD Radeon HD 7900 Series</system_gpu>
      <system_os>Microsoft Windows 8 Pro 64 ビット 9200</system_os>
      <system_memory>8116</system_memory>
    </result>
    <result />
  </results>
</benchmark>
といった形になっており、ここから結果を引っ張り出すのは(先に「ダウンロード~実行まで」の処で説明した)Result.xmlをパースするよりもずっと楽である。これもまた筆者の様に、とにかく回数を山ほど取る必要のある人間にはありがたい機能である。
次ページ:結果のばらつきの確認


