


前回から、以下のイメージのようにOAuth2 Loginをベースとしたアーキテクチャを想定した環境構築を進めています。
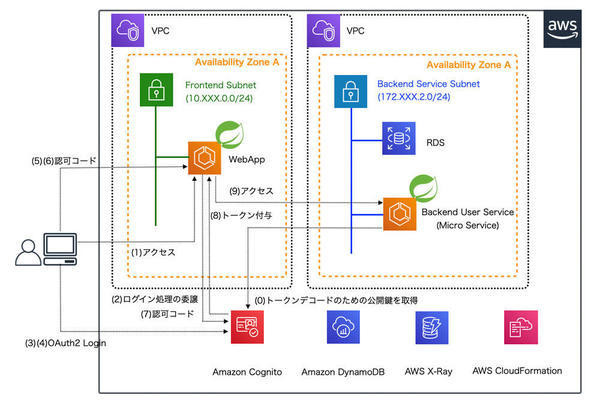 |
前回は、OAuth2 Loginに必要なAmazon Congnitoの設定をAWS CloudFormationを使って構築しました。 今回からは、OAuth2 Loginアプリケーションを実装する事前準備として、ユーザープールへユーザーを追加したり、 構築したアプリクライアントからクライアントシークレットをParameter Storeへ設定したりするLambda関数を実装し、 CloudFormationのカスタムリソースとして実行する方法を解説していきます。
なお、実際のソースコードはGitHub上にコミットしています。以降のソースコードでは、本質的でない記述を省略している部分があるので、実行コードを作成する際は、必要に応じて適宜GitHubにあるソースコードも参照してください。
初期化処理として実装するLambdaファンクション
前回までに作成したCognitoに対し、初期化処理として、以下の3つをLambdaファンクションに実装します。
| 初期化処理 | 説明 |
|---|---|
| アプリクライアントのクライアントシークレットをSystems Manager Parameter Storeに登録する | 第13回でも解説した通り、OAuth2 Loginを行うアプリケーションにはアプリクライアントのクライアントシークレットが必要になりますが、CloudFormationのOutputs要素でクライアントシークレットを出力することができません。そのため、Systems Manager Parameter Storeにクライアントシークレットの値を設定しておき、アプリケーションから参照するようにします。Parameter Storeへの設定はLambdaファンクションでSDKを使用して実装します |
| CognitoユーザープールへOAuth2 Login用のユーザーを作成する | OAuth2 LoginするユーザーをCognitoユーザープールへ追加します。ユーザーを追加することはCloudFormationで、Type: AWS::Cognito::UserPoolUserリソースで作成することもできますが、一時的なパスワードを付与することはできません。そのため、LambdaファンクションでSDKを使用してユーザー追加処理を実装します |
| OAuth2 Loginユーザーのサインアップステータスを変更する | Cognitoユーザープールへユーザーを追加すると、ユーザーアカウントのステータスが、初回サインイン時にパスワードを強制的に変更する必要がある"FORCE_CHANGE_PASSWORD"で作成されます。そのため、Cognitoの「AdminInitiateAuth API」を使って、作成したユーザーのサインアップステータスを"CONFIRMED"に更新し、サインイン可能な状態に更新します |
なお、Lambdaファンクションは、CloudFormationのカスタムリソースを使って起動します。その方法は連載「AWSで実践!基盤構築・デプロイ自動化」の第7回を参考にしてください。
Parameter Storeにクライアントシークレットを設定するLambdaファンクション
まず最初に、CloudFormationのカスタムリソースを契機としたリクエストを受け取るハンドラクラスを実装します。Spring Cloud Function 3.1以降では、「org.springframework.cloud.function.adapter.aws.FunctionInvoker」を継承して作成します。
package org.debugroom.mynavi.sample.aws.microservice.lambda.app.handler;

import com.amazonaws.services.lambda.runtime.Context;
import com.fasterxml.jackson.databind.ObjectMapper;
// omit

import org.springframework.cloud.function.adapter.aws.FunctionInvoker;
import org.springframework.util.StreamUtils;

import org.debugroom.mynavi.sample.aws.microservice.lambda.app.CloudFormationResponseSender;
import org.debugroom.mynavi.sample.aws.microservice.lambda.app.model.Status;

@Slf4j
public class CloudFormationTriggerHandler extends FunctionInvoker { //(A)

    public CloudFormationTriggerHandler(){
        super();
    }

    private ObjectMapper objectMapper = new ObjectMapper();

    @Override
    public void handleRequest(InputStream input, OutputStream output, Context context) throws IOException {
        final byte[] payload = StreamUtils.copyToByteArray(input);  //(B)
        Object request = objectMapper.readValue(payload, Object.class); //(C)
        log.info(request.toString());
        if(request instanceof Map){
            Map<String, Object> inputMap = (Map<String, Object>) request;
            for(String key : inputMap.keySet()){
                log.info("[Key]" + key + " [Value]" + inputMap.get(key).toString());
            }
            Object requestType = inputMap.get("RequestType");
            if(requestType != null && Objects.equals(requestType.toString(), "Delete")){
                CloudFormationResponseSender.send(inputMap, context, Status.SUCCESS,
                inputMap.get("ResourceProperties"), inputMap.get("PhysicalResourceId").toString(), false);  //(D)
            }
            input.reset(); //(E)
            super.handleRequest(input, output, context); //(F)
            if(requestType != null && !Objects.equals("Test", requestType)){
                CloudFormationResponseSender.send(inputMap, context, Status.SUCCESS,
                    inputMap.get("ResourceProperties"), null, false); //(G)
            }
        }
    }

 }
実装のポイントは以下の通りです。
| 項番 | 説明 | |
|---|---|---|
| A | FunctionInvokerクラスを継承します。このハンドラクラスでは、CloudFormationのカスタムリソースからのリクエストタイプに応じてファンクションの実行可否を制御します | |
| B | JSON文字列で渡されるリクエストのペイロードをコピーします | |
| C | JSON文字列をObject型(実体はMap |
|
| D | パラメータ「RequestType」が「Delete」の場合には、特に何も実行せず、CloudFormation APIに「Success」を送信します。詳細は、AWSの公式ドキュメント「cfn-responseモジュール」を参照してください | |
| E | Bで読み込みが完了したInputStreamを初期化します | |
| F | 後述するファンクションクラスを呼び出すFunctionInvokerのhandleRequest()メソッドを呼び出します | |
| G | ファンクション実行後、CloudFormation APIに「Success」を送信します。なお、条件判定では、単体テスト用にAPIに送信しないための分岐も含んでいます |
続いて、上記に記載した3つの初期化処理に対応するファンクションクラスを作成します。まずは、アプリクライアントシークレットを取得し、Systems Manager Parameter Storeへ登録するLambdaファンクションを実装します。
package org.debugroom.mynavi.sample.aws.microservice.lambda.app.function;

import com.amazonaws.services.cognitoidp.AWSCognitoIdentityProvider;
import com.amazonaws.services.cognitoidp.model.DescribeUserPoolClientRequest;
import com.amazonaws.services.cognitoidp.model.DescribeUserPoolClientResult;
import com.amazonaws.services.simplesystemsmanagement.AWSSimpleSystemsManagement;
import com.amazonaws.services.simplesystemsmanagement.model.GetParameterRequest;
import com.amazonaws.services.simplesystemsmanagement.model.GetParameterResult;
import com.amazonaws.services.simplesystemsmanagement.model.PutParameterRequest;
import com.amazonaws.services.simplesystemsmanagement.model.PutParameterResult;

import org.springframework.messaging.Message;
import java.util.function.Function;

// omit

@Slf4j
public class AddClientSecretToParameterStoreFunction
                    implements Function<Map<String, Object>, Message<String>> {  //(A)

    @Autowired
    ServiceProperties serviceProperties;  //(B)

    @Autowired
    CloudFormationStackResolver cloudFormationStackResolver; //(C)

    @Autowired
    AWSCognitoIdentityProvider awsCognitoIdentityProvider;

    @Autowired
    AWSSimpleSystemsManagement awsSimpleSystemsManagement;

    @Override
    public Message<String> apply(Map<String, Object> stringObjectMap) {
        log.info(this.getClass().getName() +  "  has started!");
        String userPoolId = cloudFormationStackResolver.getExportValue(
             serviceProperties.getCloudFormation().getCognito().getUserPoolId());
        String appClientId = cloudFormationStackResolver.getExportValue(
             serviceProperties.getCloudFormation().getCognito().getAppClientId());  //(D)
        String clientSecretParamName = serviceProperties.getSystemsManagerParameterStore().getCognito().getAppClientSecret();
        String clientSecret = getParameterFromParameterStore(clientSecretParamName, true); //(E)
        DescribeUserPoolClientRequest describeUserPoolClientRequest = new DescribeUserPoolClientRequest()
             .withUserPoolId(userPoolId)
             .withClientId(appClientId); //(F)
        DescribeUserPoolClientResult describeUserPoolClientResult = awsCognitoIdentityProvider
             .describeUserPoolClient(describeUserPoolClientRequest); //(G)
        String newClientSecret = describeUserPoolClientResult.getUserPoolClient().getClientSecret(); //(H)

        if(Objects.nonNull(clientSecret)
           && !Objects.equals(clientSecret, newClientSecret)){ //(I)
            PutParameterRequest putParameterRequest = new PutParameterRequest()
                 .withName(clientSecretParamName)
                 .withValue(newClientSecret)
                 .withType("SecureString")
                 .withOverwrite(true); //(J)
            PutParameterResult putParameterResult = awsSimpleSystemsManagement
                 .putParameter(putParameterRequest); //(K)
        }

        return MessageBuilder.withPayload("Complete!").build();
    }

    private String getParameterFromParameterStore(String paramName, boolean isEncripted){
        GetParameterRequest request = new GetParameterRequest();
        request.setName(paramName);
        request.setWithDecryption(isEncripted);
        GetParameterResult getParameterResult = awsSimpleSystemsManagement.getParameter(request);
        return getParameterResult.getParameter().getValue();
    }

}
実装のポイントは以下の通りです。
| 項番 | 説明 |
|---|---|
| A | java.util.function.Functionを実装します。Input型としてハンドラクラスで生成したMapオブジェクトクラスを、Output型としてorg.springframework.messaging.Messageを指定します |
| B | CloudFormationのスタックから取得するためのエクスポート名をプロパティクラスに保持します。実際のエクスポート名は設定ファイルであるapplicaiton.ymlに記載します。設定ファイルの記載要領は連載「AWSで作るクラウドネイティブアプリケーションの応用」の第7回を参考にしてください |
| C | CloudFormationのスタックからOutput要素で出力した値を取得するユーティリティクラスをインジェクションします。具体的な実装としては、GitHubにコミットしてあるように、CloudFormationのSDKクライアントを使ってエクスポート値を取得します |
| D | ユーザープールIDとアプリクライアントIDをCを使って取得します |
| E | クライアントシークレットをSystems Manager Parameter Storeから取得します。このファンクションを初回に起動する時はクライアントシークレットを取得することはありませんが、ユーザープールの作成が複数回繰り返し実行された場合を考慮し、既存で設定されているものを取得します |
| F | Dで取得したユーザープールIDとアプリクライアントIDを使ってcom.amazonaws.services.cognitoidp.model.DescribeUserPoolClientRequestを生成します |
| G | Fを使ってDescribeUserPoolClientResultを取得します |
| H | DescribeUserPoolClientResultからクライアントシークレット値を取得します |
| I | Hで取得したクライアントシークレット値とEを比較し、設定値が異なっているようであれば、Parameter Storeに設定し直します |
| J | セキュア文字列オプションを指定してPutParameterRequestを生成します |
| K | Parameter Storeの値を上書き保存します |
* * *
今回は、構築したアプリクライアントからParameter Storeへクライアントシークレットを設定するLambda関数を実装しました。次回は引き続き、ほかの初期化処理のLambdaファンクション実装について解説していきます。
著者紹介
 |
川畑 光平(KAWABATA Kohei) - NTTデータ
エグゼクティブ ITスペシャリスト ソフトウェアアーキテクト・デジタルテクノロジーストラテジスト(クラウド)
金融機関システム業務アプリケーション開発・システム基盤担当、ソフトウェア開発自動化関連の研究開発を経て、デジタル技術関連の研究開発・推進に従事。
Red Hat Certified Engineer、Pivotal Certified Spring Professional、AWS Certified Solutions Architect Professional等の資格を持ち、アプリケーション基盤・クラウドなど様々な開発プロジェクト支援にも携わる。AWS Top Engineers & Ambassadors選出。
本連載の内容に対するご意見・ご質問は Facebook まで。


